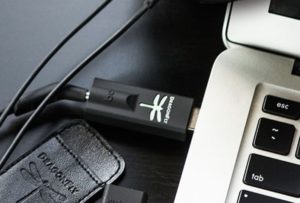
The Dragonfly by Audioquest is a pro quality Digital Audio Converter and headphone amplifier for converting your digital music to analog for a much richer, truer listening experience. It plugs into your USB port (adapter available), and comes in two flavors, Black and Red, at price points of $99 and $199 US respectively. There are some differences outlined here, but essentially the Red is the higher end version (and a bit out of my price range). The Black is still well worth it.
Essentially, this plug & play DAC takes over for the built-in audio output of your computer, which is not necessarily optimized for sound. I’ve been mixing in the box for many years, and I was just listening to a long interview with Andrew Scheps talking about how much he loves mixing in the box for all the reasons I do. At the very end, he said “but don’t use your built-in audio out, it’s built as an afterthought and not optimized for high end audio”. Which believe it or not, has never occurred to me. I did notice sound was richer when listening through my Presonus AudioBox out instead of my Mac but because I don’t always have the AudoBox with me, that just wasn’t a practical option.
Enter the Dragonfly.
Note: when I first plugged it in, it was LOUD. I mean, throw your headphones off loud. So set the Dragonfly’s output volume before listening through it. Once I set the volume (easily done in the menu bar or the sound Preference Pane), I opened the Audio-Midi Setup App* and tried it at all sample rates before setting it at a conservative 24/48K.
Very cool feature: the Dragonfly LED changes color to indicate what sample rate it is processing. This is true even if it’s set to one setting and your DAW is set to another, it will switch to reflect the current output. Easy way to tell at a glance what your session is set to.
One thing I did notice: it’s better for mixing than tracking; I had noticeable latency when tracking through the Presonus and listening through the Dragonfly. Too many converters, I’m thinking.
To be honest, I’m still getting used to hearing music through it, the range and depth is expanded in every dimension. But it’s definitely a game changer for me. I feel like I can feel the air from kick drums now!
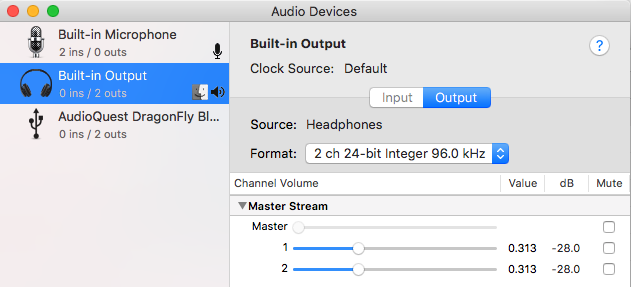
*Something I discovered in the process of setting it up that was very cool and somehow NO ONE HAD TOLD ME before is that you can set your built-in audio out from the default 24-bit/44.1K to up to 32-point/96K. I don’t mean the Dragonfly, I mean your actual MacBookPro audio out. I can definitely hear a difference between 44.1K and 96K even streaming an MP3, so if you do nothing else, do that. This is set for your default audio out using the Audio-Midi Setup application under Utilities.
My pick of the week is the latest, greatest version of Apple’s digital audio workstation, Logic Pro X 10.3. This is no minor point release, but an overhaul of an already world-class DAW. You must have OS version El Capitan (10.11) or greater to install it, but reluctant as I was to leave the comfort of 10.9, even that upgrade was a performance bonus.
The actual list of new features, enhancements, and bug fixes in 10.3 is so long I’m not even going to try to cover more than a few standouts. The full release notes are here:
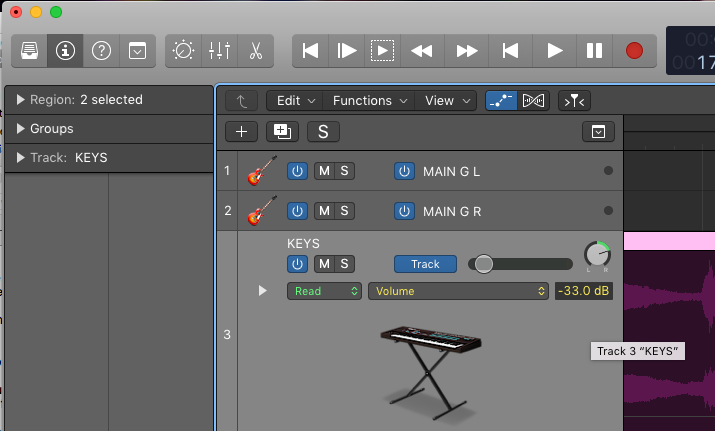
Some of the more obvious changes are with the UI itself.
The colors are different – the background is lightened from the bold darkness of 10.2, it’s now somewhere between the look of v9 and X. This is to make it easier to see in different lighting conditions.
And the buttons and tools all have a simplified 2d look that goes along with the aesthetic of the last couple OS versions. The whole thing is very responsive and slick.
My personal favorite changes in 10.3:
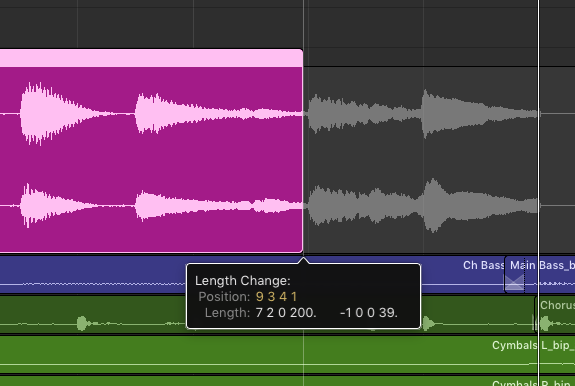
When you move the ends of a region, a ghost region appears so you can better see where you are in the audio file waveform.
There is a new standalone loudness meter that measures in LUFS (Loudness Units).
The cursor icon now changes more obviously and intuitively for the different selected tools.
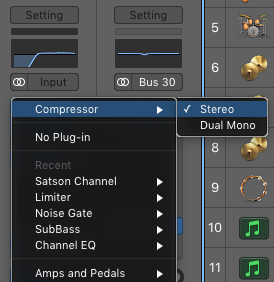
You now get the choice of stereo vs dual mono in each stereo track, and true stereo panning. (What was it before? I don’t even know!)
Less obvious changes:
Faster startup and shutdown times
Less unexpected quitting when switching between projects
Touch bar support for the latest MacBook Pros
64-bit summing engine and support for 256 busses per project
Ability to process clips separately within the same audio track
Bottom Line
If you have OS X 10.11 or higher, this is a great update to a great DAW. And if you don’t, I recommend updating. My mid-2012 MBP is so much happier with El Capitan, and so am I. And though I’m not 100% thrilled to be re-re-learning my daily use DAW, I’m loving the new features so far.
I run a weekly music chat on Twitter called the DIY Music Chat. I’ve had several questions recently about levels when recording, mixing, and mastering, and even though I’ve been doing this stuff for nearly a decade, I only recently just finished sorting through all of the conflicting information myself. So I wanted to put it all down in an easily digestible article for everyone’s reference.
What I’ve found is that there are two main reasons for the confusion about signal levels: 1) the difference between analog and digital standards and practices; and 2) the fact that a lot of people use the same words for different things. For instance, the word “level” itself. Are we talking about peaks or average? And you can’t have a conversation about decibels (dB) without knowing whether you’re talking about dBu(aka dBv, dBVU, or Voltage Units, the analog standard) or dBFS(Full Scale, the digital standard). Let’s sort some of this out as quickly and simply as possible, in terms a home recording artist can understand and use.
(For the impatient – if you just want the bottom line info, you can skip to the end of the article.)
Analog vs Digital
In the analog world, the dB scale used is in Voltage Units, and is referred to as dBv, dBu, or even dBVU, since the meter is called a VU meter. It is a measurement of signal voltage, not of sound. 0 is the nominal ceiling, but most analog equipment such as amps, consoles, and tape drives sound better when overdriven — they get a natural distortion and compression from the equipment. Many analog modeling digital plugins also like to be overdriven to a point, to get some of that musical noise effect. Read the plugin manuals to find out how this works in your plugins. To further complicate this, there are two real world voltage standards for calibrating the 0 point: +4 for studio-level equipment and -10 for consumer-level equipment. Not to mention that analog modeling plugins will have VU meters that read differently from your DAW’s built in meters.
In the digital world of our DAWs, the scale used is dBFS, which means dB Full Scale. There is no going past 0*. It is a real limit based on the limitation of digital data, and hitting that ceiling causes clipping, which means the peaks of your signal are abruptly squared off, resulting in nasty sounding digital distortion. The level meters in the channel strips of our DAWs are primarily peak dBFS meters. If the levels are getting into that little red area at the top, they are too hot.
Clipping Meter & Clipped Waveform
Levels in General
When people talk about levels, they’re usually talking about peak levels. It’s the peaks that are the concern when it comes to the recording and mixing process, as you need to make sure they’re not clipping. When you get to mastering, you start to talk more about average or RMS level, because that is where our perceived loudness comes from. There is even a relatively new unit scale called LUFS for Loudness Unit Full Scale that is meant to standardize the measurement of broadcast sound across different systems in a way that is more like how we actually perceive loudness. If your DAW does not meter in LUFS (like the new MultiMeter in Logic Pro X), you can add a plugin that does.
Mixing and Summing
Just because your individual tracks aren’t clipping doesn’t mean they won’t join together and clip at your output bus (aka 2-buss). In fact, it’s more than likely that they will, even if they’re only moderately hot signals. The best practice is to route your tracks into groups, and then use those groups to level your final output signal to your 2-buss so that you have finer control over your signal summing. Watch the meters and plugins on each track, each group, and your output bus and make sure that none of them are clipping. This process is called gain staging.
Mixing and Pan Law
To twist this just a bit, there is something called the “pan law.” A signal drops by 3 dB as you pan it to one side or the other. If you listen your mix in mono, and you should, you will hear this as the sides drop away slightly and the center gets louder. This is a good check to see how your mix will hold up in different circumstances. Some DAWS have a setting to compensate for this.
Definition of Terms
Clipping – when the signal waveform hits the ceiling (0 dbFS) and gets cut or squared off, resulting in nasty digital distortion. DAW – Digital Audio Workstation, the software application you use to record/mix/master, such as ProTools, Logic Pro, or Abelton Live. dBv/dBu/dBVU – decibel scale in Voltage Units, the standard for analog audio gear. 0 dBv = -18 dBFS. dBFS – decibel scale as Full Scale with 0 being the true upper limit, standard for digital. -18 dBFS = 0 dBv. Dithering – adding noise to smooth out the intersample steps when downsampling (going from 24 to 16 bit, for instance). Dynamic Range – the difference between peak and RMS level in a track. -10 to -15 is good dynamic range for a mastered song in most genres. Gain Staging – controlling input and output all along the signal chain to maintain proper levels. Level (peak) – the peak level of a signal, meaning the highest/loudest point reached. Level (RMS) – Root Mean Square or average level. This level is the perceived loudness. Limiter – a software plugin that acts as a ceiling to keep the signal from hitting the real ceiling. Used in mastering to add level to a track while preventing clipping. LUFS – a new scale in Loudness Units. Signal to Noise – ratio of signal (your recording input) to noise floor (hiss, hum, room noise). This is a big issue in analog recording but not very much in digital recording. Track – can refer to an individual track in a DAW or to a song, but usually a track on a channel strip. An exported single track is called a stem.
Best Practices
The following notes are based on industry standards, research, and my own personal experience. YMMV, but to be honest, you aren’t going to go wrong following the guidelines below.
Recording
Recording, aka “tracking”, is basically bringing analog signal into a digital workstation. You have level controls at the instrument, the interface, the track, and the track plugins, and you should pay attention to all of them. Get your levels properly set before hitting record.
Record at 24 bit if you can, but no less than 16 bit. You will get plenty of headroom either way.
When recording/tracking, keep peaks between -15 and -6 dBFS for good signal to noise ratio. You will hear people say -18 or even -20, but in my experience, an average of -10 to -8 peaks on recorded tracks is a good signal and anything less than -15 frankly doesn’t have good dynamic range.
Remember to record mono (single microphone) signals like vocals or guitar onto mono tracks.
Mixing
Mixing is the art and craft of balancing and enhancing your individually recorded tracks into a cohesive song. The better recorded your tracks, the easier it is to mix them.
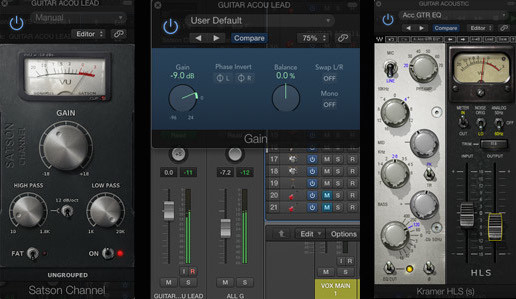
The best starting point for mixing is to level all of your tracks with a gain/trim/channel strip plugin to get all of your tracks peaking around 0 dBv or -18 dBFS. At that point, you can begin your fader adjustments for balance.
Initial Track Output Leveling
Take the pan law into account and know that your panned signals will be perceived as -3dB less EACH than they would be if they were in the center. Check in mono.
EQ and compression will affect your output levels. Keep an eye on your levels when using them, particularly with the makeup gain on compressors.
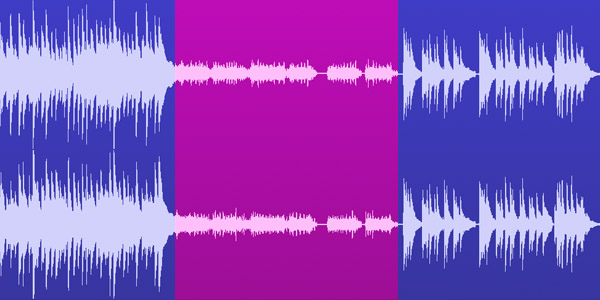
Your final output mix to send to mastering should be peaking at no more than -3 dBFS. -6 is preferred by mastering engineers, to give them room for EQ/compression/limiting. It’s perfectly fine (and perhaps recommended) to mix into some compression, but leave limiting to the mastering engineer. Do not crush your mixes.
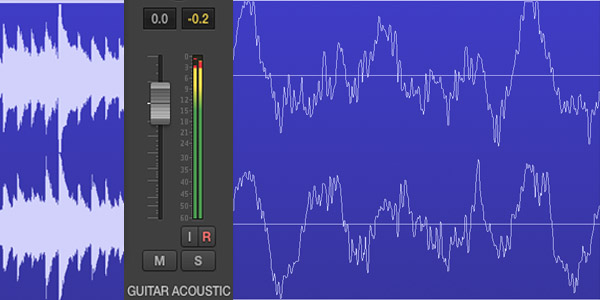
Too Hot, Too Cold, Just Right
Your final output mix should be at least 16 bit. 24 bit is recommended.
Joint/interleaved stereo WAV is the standard file format.
Mastering Mastering is the final EQ & level adjustment to bring your tracks to commercial quality sound. Ideally this is done in a sonically controlled environment by someone other than the mixer.
When I started learning mastering, I heard that the standard practice is to set your hard limit at -.1 dBFS, or even -.3 dBFS, to allow a “little room for overs” when bouncing or translating between formats. I only recently found out that if you are bouncing to MP3, which everyone is, you should actually be setting an upper limit of -.5 or even -.7 dbFS because of the extra processing to compress the song into a lossy format.
Set your limiter ceiling to -.5.
The recommended RMS or LUFS for a mastered track depends on the genre, so check against your reference track. Generally stick to the -10 to -12 RMS/LUFS range. Note that with your ceiling close to 0, a -10 RMS/LUFS translates to 10dB of effective Dynamic Range.
The more you shrink the Dynamic Range, the more compressed and distorted your track will sound.
The standard format for a mastered track is 16bit/44100Hz, which is the CD standard. The Mastered for iTunes standard prefers 24bit/44100Hz.
If you downsample from 32 or 24 bit to 24 or 16, you should dither the WAV with MBIT or Type 2 noise shaping.
You can check for intersample clips with Apple’s Mastered for iTunes. Check a bounced MP3 as well as the WAV file.
Bottom Line Recommendations
Recording peak levels: -15 to -6 dBFS Mixing peak levels per track: 0 dBv / -15 to -6 dBFS on each track to start, watch clipping in plugins Mixing output peak levels: -6 dbFS to -3 dBFS Mastering Peak Limit: -.5 dBFS Mastering RMS: -10 dBFS or LUFS
Last Word
Remember, this is music. It’s about the quality of the sound and the groove and the emotional connection with the listener. Don’t get so caught up in watching your meters that you forget to listen to hear if it sounds good. Remember, if it sounds good, it is good!
*yes, I know about 32 bit floating point, but that is beyond the scope of this article.
 The Dragonfly by Audioquest is a pro quality Digital Audio Converter and headphone amplifier for converting your digital music to analog for a much richer, truer listening experience. It plugs into your USB port (adapter available), and comes in two flavors, Black and Red, at price points of $99 and $199 US respectively. There are some differences outlined here, but essentially the Red is the higher end version (and a bit out of my price range). The Black is still well worth it.
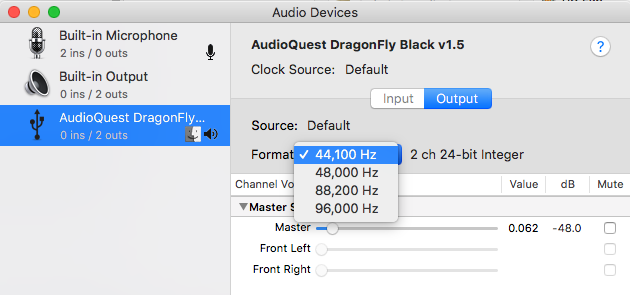

 My pick of the week is the latest, greatest version of Apple’s digital audio workstation, Logic Pro X 10.3. This is no minor point release, but an overhaul of an already world-class DAW. You must have OS version El Capitan (10.11) or greater to install it, but reluctant as I was to leave the comfort of 10.9, even that upgrade was a performance bonus.